Showing posts with label Practice. Show all posts
Friday, 4 December 2015
Second practice session
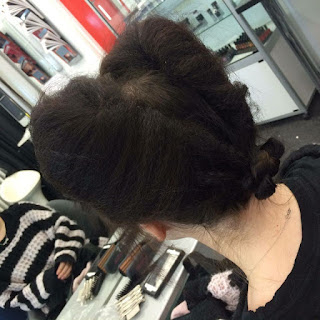
During my spare time, I decided to practice my partner (Georgia's) hair design again on my Katie head this time. I repeated the exact same step by steps as I wrote in my previous blog post.
First practice session
My partner, Georgia wanted heart shaped hair. She wanted me
to crimp the entire head and create two buns (one on each side of the hair) to achieve
the heart shaped hairstyle. She also wanted a plaited bun on the bottom half of
her hair. Luckily, we live in the same building therefore we were able to talk
to each other a lot about our designs. During our first practice session with
Lottie, she guided me on exactly how she wants her hair. This is what the final
design looked like:
For my first practice, I believe I done well. I wanted Georgia to approve of the overall look, therefore I kept communicating with her to ask if I'm on the right track. She, herself was very pleased that I was able to deliver her design exactly how she wanted. Georgia had a bald patch in the centre of her head which she was very embarrassed about. I reacted very positively towards this issue, and pretended I didn't even know. I was very careful when working near that area as I didn't want to burn her with the crimping iron.
I managed to finish the hairstyle on time and was very pleased with her final design. I made my own guide as to how Georgia wants her design so I'll remember for the actual assessment. Next time I do this hairstyle however, I'll make sure to crimp the exactly from the root to avoid straight hairs. Georgia has very straight hair, and area's that I hadn't crimped properly were very obvious.
Step-by-Step guide:
Required equipment: hair pins, hair/elastic band, Denman
brush, sectioning clips, a crimping iron, and a pin tail comb.
1.
Firstly, brush the hair to get rid of any knots.
2.
Crimp the entire head and brush it out to create frizz.
3.
Section the hair into three. A right side, a left side (centre
parting) and the bottom half (just beneath the ears). You may want to clip the
bottom half to get it out the way.
4.
You’ll now be creating two heart shaped buns.
5.
Take small sections of the crimped hair and
backcomb it using a pin tail comb.
6.
Once all the hair is backcombed, create half a heart on both
sides. Secure the ends into place using hair grips.
7.
Create a wrap bun with the remaining hair on
the bottom.
8.
Using booby pins, tuck in the ends of the
hair to hold it in place.
Design 3
For my final chosen design, I wanted big crimped hair, pin
curls on the sides and curls for the bottom half. I chose this hairstyle as I have
a lot of hair; also my hair is quite thick and dry due to all the bleaching I’ve
done. I knew it wouldn’t be difficult to get my hair at a high volume because I
do this regularly on nights out. I personally think the bigger the hair the
better. The only thing I’m worried about is my partner having difficulties with
delivering my chosen hairstyle. When we spoke, she did tell me she’s not so
confident with hair therefore I tried to create a design that isn’t too
extreme.
In order to create my hair design, my partner will require a
curling wand, a crimper, hair grips, Denman brush, a pin tail comb, a smoothening
brush and sectioning clips.
Inspiration:
esme,
laneway, the and profile, V. my complete (2012) Need to find something?.
Available at: http://esmeandthelaneway.blogspot.co.uk/2012/08/how-to-my-pin-curl-set-for-1940s-hair.html
(Accessed: 4 December 2015).
sreevesg and profile, V.
my complete (2014) Hair. Available at: http://fms407sreevesgredheadsandroyalty.blogspot.co.uk/2014_10_01_archive.html
(Accessed: 4 December 2015).
Step-by-Step guide:
Required equipment: hair pins, hair/elastic band, Denman
brush, sectioning clips, a crimping iron, and a pin tail comb.
- Firstly, brush the hair to get rid of any knots.
- You must section the hair into two parts (a top half and a bottom half).
- Crimp the entire top half of the head and brush it out for a frizzy effect.
- Take small sections of the crimped hair and backcomb it using a pin tail comb.
- Once all the hair is backcombed, create an oval shaped quiff and secure it into the head using hair grips.
- Take two small sections of hair from the back section you created (right next to the ears) and create small pin curls using your fingers. It must be shaped like a circle. Secure this with hair grips.
- Curl the remaining hair on the bottom half.
- (I did the images below during an evening session and there wasn’t any curlers available for me to curl the bottom half of the head as the cupboards were locked).
Overall I liked this design as it included crimping and
curling. I also liked the very obvious Elizabethan aspect, the height. It’s a big hairstyle (what I wanted) and would work perfectly on my type of hair. What
I found difficult about this hairstyle was getting the quiff as round as I could.
I kept having to check the mirror to ensure its balanced and smooth from all
angles. I hope my partner is good at backcombing as my design requires a lot of
it. It’s also quite time consuming as I have a lot hair, therefore she may need
to crimp my hair beforehand.
Design 2
For
my second design, I did a simpler plait (3 strands) including a wrap bun and
two wide barrel curls. Before I did this however, I crimped the entire hair to
achieve a frizzy texture as my Katie head was too smooth to work with.
Inspiration:
Hair (2013) Available at:
https://www.pinterest.com/pin/528469337495558061/
(Accessed: 4 December 2015).
Updos that get noticed:
Barrel curls: Hairstyles (no date) Available at: http://www.thehairstyler.com/blogs/hairstyles/updos-that-get-noticed-barrel-curls
(Accessed: 4 December 2015).
HELP: 1940s – 1960s
hair-styles for long hair (no date) Available at: http://boards.weddingbee.com/topic/help-1940s-1960s-hair-styles-for-long-hair/(Accessed:
4 December 2015).
Step-by-Step guide:
Required equipment: hair pins, hair/elastic band, Denman
brush, sectioning clips, pearl adornment and a pin tail comb.
- Firstly, brush the hair to get rid of any knots.
- Crimp the entire head and brush it out to create frizz.
- Section the hair into three. A right side, a left side (centre parting) and the bottom half (just beneath the ears). You may want to clip the bottom half to get it out the way.
- You’ll be creating two large barrel curls. In order to do this you must backcomb both sections and using your fingers, fold the hair inwards, creating a loop shape.
- Secure the hair into the scalp using hair grips.
- Take two small sections of hair from the back section you created (right next to the ears) and plait them (3 strand plait). Secure the plaits with an elastic band.
- Bring the plaits together at the back centre of the head and secure them onto the scalp using hair grips.
- Create a wrap bun with the remaining hair on the bottom.
- Using booby pins, tuck in the ends of the hair to hold it in place.
I really
enjoyed creating this hairstyle. I love barrel curls however it’s more of a
1940’s look therefore I didn’t want to choose it as my final design. I really
liked the shape of the curls, and the way I incorporated three techniques into
one. This hairstyle inspired me to crimp my final design. It also gave me ideas
on how big I want my final design to be. I think if we were doing period hair
in general rather than just Elizabethan, I would definitely choose to do barrel
curls on myself as I have very thick long hair therefore it’d stand greatly in
place.
Design 1
For my first design, I wanted to do something similar to the
crown braid hairstyle with the use of adornments such as pearls.
Inspiration:
Hair styles ,makeup
coats, Tshirts (2013)
Available at: https://www.pinterest.com/pin/172544229445600871/
(Accessed: 4 December 2015).
Polska, G. W., tajtan and
jary, ale (2005) 10 rzeczy, które mężczyźni
uważają za nieatrakcyjne. Available at:
(Accessed: 4 December
2015).
Clothing gallery - Coifs
(and hair) (2012) Available at:
https://lhresources.wordpress.com/17th-century-clothing-for-reenactors/clothing-gallery-women/clothing-gallery-coifs/ (Accessed: 4 December 2015).
Step-by-Step guide:
Required equipment: hair pins, hair/elastic band, Denman
brush, sectioning clips, pearl adornment and a pin tail comb.
- Firstly, brush the hair to get rid of any knots.
- You must section the hair into two parts (a centre parting).
- Starting on one side, separate your section into three smaller sections, as if you were doing a regular plait.
- Continue to do this however every time you bring a section into the middle, grab a section of hair from that side and bring it into the plait. (The tighter the plait, the better the results.
- Repeat this all the way down until you reach the tips of the hair.
- Use an elastic/hair band to tie the plait.
- Do the same on the other side.
- Once both sides are done, bring the plait (the ends) of the left side section and secure it underneath the right side plait using grips.
- Do the same on the other side.
- Attach the pearl adornment into the hair, securing it with grips if needed.
Although I liked this design on the Katie head, when my
partner attempted to do it on me it didn’t look as great. She wasn’t so
confident with plaiting and I didn’t want to make things difficult for her so I
decided to change my design.
I also felt like this hairstyle wasn’t big enough for my
likings. There wasn’t enough frizz or volume to it, and it looked more like
bridal hair than Elizabethan. I did however like the use of adornment, as the
pearls were very similar to what Queen Elizabeth wore herself.
Subscribe to:
Posts (Atom)


